Pages

Wednesday, January 29, 2014

Hugs N Kisses!!


Happy Sunday!! 

Today I have a cute little project for Gina's Designs.  It is a wall hanging kit- pretty much everything is included.  So I covered the back piece of chipboard with some cute little XOXO paper from SU.  I then painted my X's and O's with pink and white paints and then added a little texture to the tops of the pink ones.  I also used a few little gems on the whites to give it a little extra sparkle.  The pink heart border was also a part of the kit.  

Gina's Designs Product

Sunday, January 26, 2014

Simple Project Life with Gina's Designs and The Robins Nest

Are any of you participating in Project Life or at least similar type memory keeping? I am working on a project and thought that I could use some of Gina's Designs products on these little cards.  So here I have made 2- 3x4 in cards and 1- 4x6 card.  I kept these cards clean and simple but had a great time with the chipboard pieces.  These will easily slip into my protectors.  

Products:
Gina's Designs: String Alongs Hearts
The Robin's Nest: Wild About You

Saturday, January 18, 2014

Gina's Designs and The Robins Nest....

Hello everyone,today I am showing off a project in collaboration with Robin's Egg Papers.  We got some cute Valentine prints and so what could be cuter mixed with my Gina's Designs chipboard. 
Here is a photo of all the cards together. I kept all the backgrounds white and then layered the printed paper with red.  
This card uses a doily and one of the sweet little Valentine String Alongs- so darned cute!  
 This one was fun, a little block card with one of the heart pieces as a center.  
And then this final one has the most chippies on it- all misted with glimmer mist. These pieces are so easy to use on your Valentine projects, leave them natural or color them!  And you get lots of pieces!  
Don't wait though- get them now so you can work on those heart shaped goodies! 

Products:  The Robin's Nest: Wild about you paper Gina's Designs:  Valentines Shape Set  Gina's Designs: Cardstock Doily Set Intricates Gina's Designs: Border Sticks Gina's Designs: String Alongs Hearts

Friday, January 10, 2014

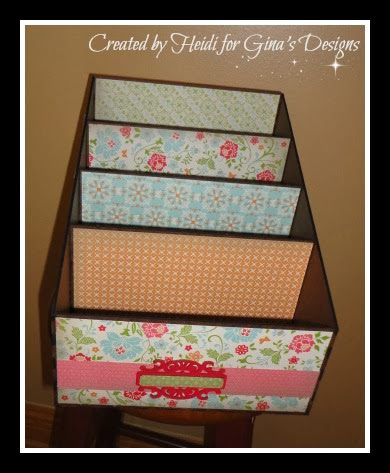
Luvin' my paper pad storage!

  I don't know if you are like me but I have piles of 6x6 and 8x8 paper pads in my cabinet but find if I have them out on my desk I am more inclined to use them.  I also like to bring out my season pads so that I remember what I have- and what a great way to do this with Gina's Paper Pad Holder.  
When I got this box I had to assemble it and I wanted to share a couple of photos on how easy it is to put together.  
1. I typically lay all the pieces out to see how they fit together, make sure the shinier side is on the outside and that all the slots fit- basically put it together without the glue. 
  
2. I then start the glue process, remember there are slots so I put a small amount of E6000 along the edges and then stick them together- holding them in place with some support as you will see in picture 3.
3. Once I get the outside pieces together it will look like photo 4: to get to this step I will usually put all 3 pieces together and then provide the support on each side so that in 30min the outside is together and dry enough to move on. 
4. The last step is to add the dividers, once you put all these pieces in you will want to make sure that you have the support to push it together on each side again until the glue dries (approximately 30min).  And there you are ready for the fun part! 

And there you go- time to do some fun embellishing.  You can make it quite simple as I have- or go way out with die cuts and chippies!  
Gina's Designs Product: