Pages

Thursday, March 28, 2013

Spring Has Sprung!!!


Hello and welcome, so glad you are stopping in today.  I have for you a piece of wall art, I had a lady make a request for me to make some canvas art for her and she provided the inspiration for this wall art in the form of a pillow that she bought to have on her couch.  So the main things I took from the pillow are as follows: 

1. It is a cream colored pillow
2. It has birds, birdcages and butterflies  
3. The background of the pillow had a print in black on it
4. The colors were green, yellow and what looked like a poppy reddish/orange 

So with all those facts in my mind (running around I might ad!) this is what I came up with!  I think that it turned out very pretty and I put a piece of the poppy color paper (in lieu of a photo) but you could also put another smaller photo to the left and/or put 2 medium size photos on the canvas.  

Items: Gina's Designs (of course)

I had a great time creating this canvas- I was able to do alot of painting and airbrushing with a few different products.  Kind of like being a kid again (except I didn't taste any of it!).  I hope you will post a comment and let me know what you think! 
Heidi

Saturday, March 23, 2013

It's GREEN

 
Happy Sunday! 

I do hope that this week brings some warmer weather to Michigan, I tell you it has been so cold.  You know the saying in like a lion and out like a lamb.... well not so much here!  It seems more like Christmas!   So I was really "wishing" for some green and thought I would make this springy card.   

I found these sweet little images By LORi Designs and thought I would join their GREEN challenge as well.  Check them out! And here is to a warmer week for everyone!  
Heidi

Wednesday, March 20, 2013

Think outside the box

Hello friends!  Today I just wanted to do a quick post more of a little inspiration.  As many of you know I have been designing for Gina's Designs, these are beautiful chipboard laser cut pieces.  Now I love chipboard .....  what crafter doesn't once she gets into getting messy and "dressing" them up.  So I thought I would post about some quick reminders on decorating your chipboard!  I think that sometimes I forget all the options!  
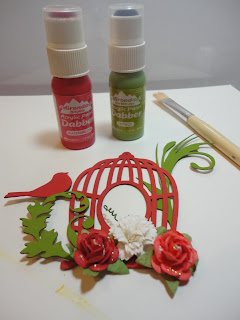
 So these first two photos are of ideas for painting  your chipboard.  I pulled out my adirondek daubers and a paintbrush and went to town.  Now you could daub them but it didn't give me the texture I wanted.  You don't see this here but I also added some stickles to the word dream to give it a little sparkle.  
 This doily I wanted to have a little spritz of color vs the white it was so I pulled out my airbrush system and copics.  What is nice about this technique is that you can make it just a light shade of the color, a darker shade or a mixture of a couple colors (very pretty!).  The world is your pallete.  
This last photo is the chipboard covered with designer paper and embellished with buttons, ribbon and lace: 
 and a little inking along the edges.  

 Well I hope this little post gives you some inspiration to go out and alter and embellish your chipboard.  Check out what Gina has HERE.  Also- do tell, how do you dress up your chipboard????

Thanks for stopping !
Heidi

Wednesday, March 13, 2013

Oh baby......

 Hello!  Today I am excited to show you this little baby album that I have been working on over the last week.  It is more of a smash book and I focused on using the little girl Clothesline Set from Gina's Design, is it not adorable? I love these little shapes, they are so perfect and I was able to do a couple different techniques to cover them.  The front page I used the clothesline and covered each of the pieces with coordinating papers and then added a few little embellishments.   Is this little girls frilly dress not the sweetest? Buttons, lace and bows!  
This is a picture of the book as you open it.  I love making these books so the pages stagger and then I can add little embellishments that stick out from each of the pages as if they were tabs.  This book has the safety  pin and the binkie.  
Look at these little baby booties and bottle....   I covered the bootie with a light pink ink and some stickles and the baby bottle is covered with white picket fence crackle paint and a little stickles.  
The little duck is also covered with yellow crackle paint and attached to this little pocket- of course a sweet sentiment about little girls.  
 And of course, the binkie!  Didn't I tell you these pieces were adorable?  If you are working on a baby project I guarantee you will not be disappointed in this package of chipboard.  It can be found HERE. 
I do hope you have a wonderful day- go out and be creative! 
Heidi 

Wednesday, March 6, 2013

Off The Page.... and lovin' it!

Hello my dear friends!  So this last week I got my new  Off The Page package from Gina's Designs and I am loving these items.  They are a thick hardboard, sturdy and thick.  
I think that they are wonderful to work with and so versatile.  I thought I would show you a couple of the items that I got and I am sure you will love them for your upcoming projects! 
 Gina has these beautiful words and these very detailed butterflies.  Yes, these are very nice sized- great for using on larger projects.  Oh I can't wait !!!!
 I do apologize for the little "glare" in the middle of the photo frame but I took over 4 photos and it just didn't work. So I thought I would at least get this out there for you all.  I have a few ideas for these frames, so doesn't it just get your creative thoughts flowing?
And then I had to show this, I am working on a baby album right now but this is a sweet little baby "box".  I recommend that you stop on over to Gina's Designs and give them a try.
Heidi

Saturday, March 2, 2013

Make it Green.............


Happy Weekend my friends! 

So this weekend I am working on a couple of projects but I was able to fit in a little card.   I printed off a few of the Gina's Designs free digital images for St Pat's, they are so sweet and vintage.  The little doily in the back is a perfect fit with the clovers which I covered in a little sparkle (don't you think?)  I also added a little ribbon (green + ribbon= RRR).  I hope you all have a wonderful weekend- now go and create GREEN. 
Heidi