Pages

Sunday, April 27, 2014

Heart Wall Art


A key to the journey of our lives.  When I got this from Gina I was a little perplexed on what I would do with it.  I wanted to make something that I would be able to use in my home, a little addition of "steampunk" and vintage together. 

I started with the chipboard key and painted the entire key with grey paint.  I then took the steampunked/gear heart (the top piece) and painted it yellow.  Once all the pieces were dry I then took individual gears and painted them gold and attached them randomly over the heart.  I then used the wings and a couple of gears to accentuate the middle point  


The vintage lace was threaded with a gold ribbon and the word journey along with the key were added. 

Now it is something I can hang in the house with a little extra flair!  

GDT products: 

Saturday, April 26, 2014

Just Rite Two...


Another "krafty" card for the Just Rite Challenge this month.  I showed the first one earlier and I could not stop at one so this is my second one.  The first one didn't seem to have enough kraft on it- this one I added a little more (or shall I say let it show)  

Just Rite One.....


Happy Weekend!  
Today I took some time to make a few birthday cards and also this friendship card.  The Just Rite Challenge is to use Kraft paper and so this is the card.  I pulled out a new paper pad as well and added a few of my wild orchid flowers.  The Friendship blooms sentiment comes from the JustRite set by that name. 


Sunday, April 20, 2014

Reverse Confetti April

I hope you all had a lovely Easter Holiday Weekend!  We were blessed to have beautiful weather and yummy food.  So once my dinner was in the oven, everyone else was still sleeping and so I decided to head on down to my craft room and work on my Reverse Confetti  Color Challenge.  At first quite honestly I was skeptical of the colors......

These are definitely not colors that I would naturally put together but I pulled out a few of my paper pads and low and behold I was able to pull some together! The sketch is something that I put together with a few "ideas" rolling around in my head. 

I used the RC die Love Note and Stamp Set Arrows N Elements.  The little flowers I am not sure where they came from but I had them in my stash so I am thinking Wild Orchid.  And now that the card is done- I really do like the colors together!  What do you think?  

Have a great week! 
Heidi

Happy EASTER!


So this week I thought I would make a little spring project that will also fit for this weekend's EASTER celebration.   I had these candy tubes and of course some jelly beans and they fit so well with the dangling spring sentiments and embellishments in the spring shape set over at Gina's Designs.  


I painted all the pieces first with adirondak paints and then used a speckled stamp for the umbrella and an eraser for the boot!  Aren't they cute?  I just attached them to the ribbon and they hang down like charms.  :) 

Gina's Designs Product:

Monday, April 14, 2014

JR Challenge. some masking


Today's card is made for the Just Rite challenge.  We were asked to use the masking technique and so I started with the Have Courage sentiment and then made a mask to fit over it, stamping the ribbon over the top.  I wanted this card to be soft and pretty; to give to a friend who is going through a rough time.  I hope you will join the challenge if you have some time.

JR Spellbinder Dies: Vintage Label V 

Sunday, April 13, 2014

Gina's Designs CHALLENGE!!!!


Well, it seems Spring is upon us and we, at Gina's Designs Lasercuts want to celebrate this by doing a Challenge Giveaway! You can WIN this amazing prize package!! All you have to do is follow the color palette, add your own butterfly and post a CARD, LAYOUT or Other project here on our Facebook page. (You do not have to use Gina's Designs Products to enter this Giveaway!) 

This is a great prize package with some of our beautiful butterflies we have in our shop! We cant wait to see what you come up with! Challenge will close Friday April 18th at Midnight CST. Contest is open to INTERNATIONAL as well as DOMESTIC


Seaside Escape

Hello!!  So today's project is a little different don't you think?  The base of the project is the Gina's Designs Spool  At first i was not sure what to do with it and then i went through all the chipboard scenes I had  and the beach is where I wish I was now- so here it is. 
The spool was coated with modge podge and then I covered it with coarse sand.  Then I took all the little pieces and started painting them.  Lets see what there is here, first is the little adirondeck chair surrounded by shells and flowers.  Look at the little lobster!   In the background is the white weathered fence with the life saver hanging on it surrounded by some tall grass.  Atop the entire spool is a lighthouse ... beckoning you to come and join us on the beach!
Come join us for some sunshine and sand!

Gina's Designs Product


Tuesday, April 8, 2014

Reverse Confetti #11 Just sayin'

Hello everyone!  Today's card is made using the Reverse Confetti challenge!  I find that I am really enjoy banners and so I thought I would work them into this sketch.  The little dots are ones that I spent this last Saturday making out of perlers.  It was alot of work but fun to see all the colors- reminds me of old fashioned candy dots.  

So here is the sketch.   I had in my mind what I wanted the card to look like but I turned the sketch and worked from there.  The sentiments on the card are from Reverse Confetti Arrows n Elements

Have a great week! 
Heidi

Sunday, April 6, 2014

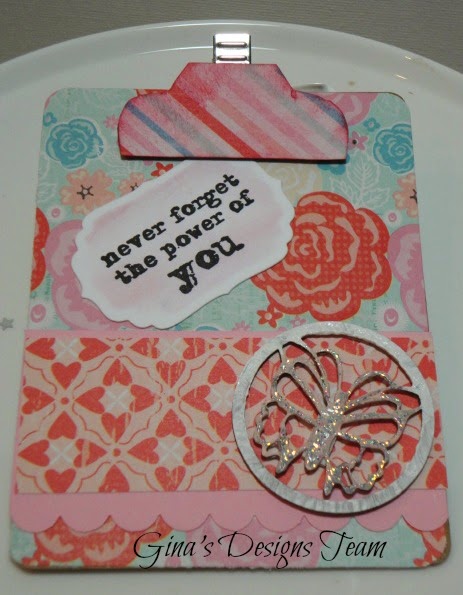
Clip a Quote


So today I am showing off a cute little project from Gina's Designs.  It is kind of fun because it is quite different from most things  It is about 3-4 inches in size and a nice little gift for someone in your office with a special inspiration. The little kit comes with the board, the little tag top and the clip- easy peasy to put together and decorate!  

Gina's Designs Product: 


Saturday, April 5, 2014

Handmade Candy Dots!!!

 I just have to share with you all what I have been doing this weekend!  I have seen these little candy dots for use on cards and scrapbooking but have not picked any up just because I want all the colors out there and that would just not be really economical.  So I had seen that people were purchasing the Perlers and melting them in their oven- so guess what I did? 
 So this is what they looked like when I started.  Now honestly this did take some time.  My youngest son says, "That takes a lot of patience and I just could not do it"   So I got them sorted and lined up and popped them into the oven at 325 degree for 20 minutes! 
 Here you go- the end results!  Aren't they pretty?  I just love all the colors and thrown them all together and a colorful rainbow.  Makes me want to eat them, yeah I know..... weird but I tell you the truth! 
Now I have so many- I think that I am gonna have to sell some of them!  ADDED: Perler beads can be found in any craft store and online